An automated faceless YouTube AI automation system is a structured pipeline that converts text research into published video content without human narration, on-camera presence, or manual editing—using AI for scriptwriting, voiceover generation, visual creation, and assembly. In March 2026, these systems represent the ultimate scalable digital asset, allowing creators to produce 30+ videos monthly while working less than 5 hours per week, with some channels generating $3,000-15,000 in monthly ad revenue through pure automation.
The Delivery: Connecting the Dots
In our previous guide, The Deep Research Machine, we learned how to gather factual, verified data using autonomous research agents. You now have comprehensive reports on any topic—market trends, historical analysis, technology breakdowns, competitor intelligence.
But research sitting in a Markdown file doesn’t make money.
The next evolution is transforming that data into engaging, high-retention video content that captures attention on YouTube, Instagram, and TikTok. And we’re doing it without showing your face, recording your voice, or touching a video editor manually.
This is faceless YouTube AI automation—the complete pipeline from research report to published video, with minimal human intervention. The system we’re building today can:
- Convert a 2,000-word research report into a 60-second YouTube Short script in 30 seconds
- Generate a professional AI voiceover in 2 minutes
- Create B-roll visuals (images, video clips, animations) in 5 minutes
- Assemble everything into a finished video in 3 minutes
- Total time: 10 minutes per video, mostly automated
Channels using this exact workflow are publishing 2-3 videos daily, building audiences of 100k+ subscribers in 6-12 months, and monetizing through ads, affiliate links, and sponsorships. This guide provides the exact prompts, settings, and configurations to build your own automated video factory.
We’ll cover three levels:
Level 1: Script and voice generation (AI writing + text-to-speech)
Level 2: Visual creation (cloud tools vs. local generation)
Level 3: Assembly automation (connecting everything into a workflow)
Mastering this faceless YouTube AI automation process is what separates casual creators from digital media companies.
Level 1: The Script Engine for Faceless YouTube AI Automation
The foundation of every great video is the script. For YouTube Shorts, TikToks, and Instagram Reels, you need scripts optimized for mobile viewing and short attention spans.
The High-Retention Short Script Generator
Copy this entire prompt and use it with ChatGPT, Claude, or Gemini:
You are a YouTube Shorts Script Writer specializing in high-retention, educational content.

SCRIPT STRUCTURE REQUIREMENTS:

HOOK (First 3 seconds - CRITICAL):
- Start with a shocking statistic, bold claim, or provocative question
- Must create curiosity gap that demands resolution
- Examples: "97% of people don't know this..." / "This mistake costs $10,000..." / "The truth about X that nobody tells you..."

BODY (Main 50 seconds):
- Break information into 3-5 rapid-fire points
- Each point should be 8-12 seconds maximum
- Use pattern interrupts every 10 seconds (visual changes, music shifts, text animations)
- Avoid fluff—every sentence must deliver value
- Use conversational language (contractions, short sentences, active voice)

CALL TO ACTION (Final 7 seconds):
- Explicit next step: "Follow for part 2" / "Comment your biggest question" / "Try this today"
- Create urgency or FOMO

RETENTION TACTICS:
- Tease upcoming points: "But here's what's crazy..." / "Wait until you hear #3..."
- Use open loops: Promise information and deliver it 15 seconds later
- Include specific numbers, percentages, dates (builds credibility)

FORMATTING:
- Write for spoken delivery (how it sounds, not how it reads)
- Mark visual cues in [BRACKETS] where graphics/B-roll should appear
- Indicate pacing: Use / for brief pauses, // for longer pauses

INPUT: [PASTE YOUR RESEARCH REPORT OR TOPIC HERE]

OUTPUT: A 60-second script optimized for retention, formatted for easy reading by text-to-speech.
Example Output:
If you input a research report about meal-kit industry failures, the AI generates:
HOOK (0-3 sec):
"99% of meal kit startups fail within 3 years. Here's the dirty secret they don't tell you."

BODY (3-53 sec):
[GRAPHIC: Revenue chart declining]
The average customer acquisition cost? $120. / The average customer lifetime value? $200. // Do the math. / Most companies lose money on every single customer.

[B-ROLL: Meal kit boxes]
Here's what killed them: Number one / supply chain complexity creates 12% food waste. // Number two / customers cancel after trying just 3 boxes. // Number three / Hidden costs nobody accounts for—packaging alone eats 18% of revenue.

[GRAPHIC: Bankruptcy timeline]
Between 2024 and 2025, 14 major players shut down. / The survivors? They're not profitable either. / They're just better at raising investor money.

CTA (53-60 sec):
If you're thinking of starting a meal kit business // comment "NOPE" and I'll explain why ghost kitchens won the war instead. / Follow for brutal business truth.
Voice cues included. Visual markers added. Retention hooks embedded. This script is ready for voice generation.
Text-to-Speech Settings (ElevenLabs Recommended)
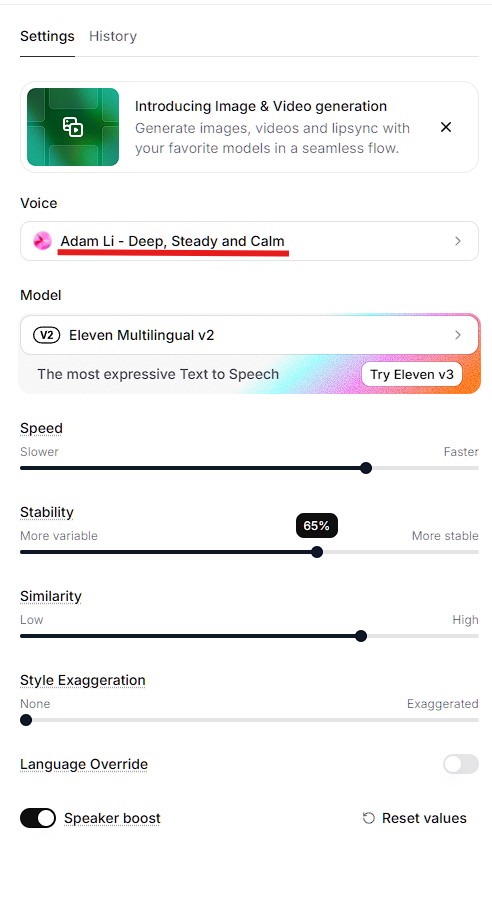
Best settings for YouTube narration:
- Voice selection: Choose voices labeled “Narration” or “Conversational” (avoid “Announcer” style)
- Stability: 60-70% (too high = robotic, too low = inconsistent)
- Clarity: 80-85%
- Style exaggeration: 15-25% (adds natural emphasis)
- Speed: 1.1x (slightly faster than normal speech keeps energy high)
ElevenLabs API workflow:
python
# Simple Python script for voice generation
import requests

url = "https://api.elevenlabs.io/v1/text-to-speech/VOICE_ID"
headers = {
    "xi-api-key": "YOUR_API_KEY",
    "Content-Type": "application/json"
}
data = {
    "text": "YOUR_SCRIPT_HERE",
    "model_id": "eleven_monolingual_v1",
    "voice_settings": {
        "stability": 0.65,
        "similarity_boost": 0.8,
        "style": 0.2
    }
}

response = requests.post(url, json=data, headers=headers)
with open("narration.mp3", "wb") as f:
    f.write(response.content)
Cost: $0.30 per 1,000 characters (approximately $0.05 per 60-second script)
Time: 30 seconds generation
Quality: Indistinguishable from human narration for most listeners
Alternative (free): Google Cloud Text-to-Speech offers Wavenet voices at lower quality but zero cost for first 1 million characters monthly.
Level 2: Visual Generation (Cloud vs. Local)
Scripts and voiceovers are useless without engaging visuals. You have two paths: cloud services (easy, expensive) or local generation (setup required, free after initial investment).
Option A: Cloud-Based Visual Generation
Best tools for faceless content:
Runway Gen-3 (Video generation):
- Input: Text prompt describing scene
- Output: 4-second video clips
- Cost: $0.05 per second ($0.20 per clip)
- Quality: Photorealistic, minimal artifacts
- Use case: B-roll footage, establishing shots
Midjourney (Static images):
- Input: Text prompt for images
- Output: High-quality stills
- Cost: $30/month unlimited
- Quality: Industry-leading aesthetics
- Use case: Thumbnail generation, infographics, scene backgrounds
Pexels/Unsplash (Stock footage – FREE):
- Massive libraries of royalty-free video clips
- Quality varies but sufficient for most B-roll needs
- Zero cost, immediate availability
- Use case: Generic establishing shots, transitions
Cloud workflow:
- Use ChatGPT to generate image prompts from script visual cues
- Generate images/videos via Midjourney/Runway APIs
- Download assets
- Feed into video editor
Total cost per video: $2-5 depending on custom visual needs.
Option B: Local AI Video Generator (ComfyUI)
For creators producing 30+ videos monthly, local generation becomes cost-effective. ComfyUI is the open-source standard for local AI video generator workflows.
System requirements:
- NVIDIA GPU with 12GB+ VRAM (RTX 3060 minimum, 4090 ideal)
- 32GB+ system RAM
- 100GB+ free storage
Setup (one-time, 2-3 hours):
bash
# Install ComfyUI
git clone https://github.com/comfyanonymous/ComfyUI
cd ComfyUI
pip install -r requirements.txt

# Download models
# Stable Diffusion XL (8GB): https://huggingface.co/stabilityai/stable-diffusion-xl-base-1.0
# AnimateDiff (2GB): https://huggingface.co/guoyww/animatediff

# Place models in ComfyUI/models/ directory
Workflow configuration:
ComfyUI uses node-based workflows. For faceless videos, load the “Text-to-Video” preset:
- Text input node: Paste your visual description
- Sampling node: 20-30 steps (balance of quality and speed)
- Video output node: 512×512 or 768×768 resolution (upscale later for YouTube)
- Batch processing: Queue 10-20 clips at once, let it run overnight
Generation time: 2-5 minutes per 4-second clip (depending on GPU)
Cost after initial setup: $0 (electricity only)
Quality: 85-90% of cloud services but improving monthly
When to use local:
- Producing 30+ videos/month (ROI breaks even at ~50 videos)
- Need visual consistency across series
- Privacy concerns with cloud services
- GPU already available for other work
When to use cloud:
- Just starting, testing viability
- Low volume (1-10 videos/month)
- No suitable GPU hardware
Most creators start with cloud tools, then transition to local generation to scale their faceless YouTube AI automation empire once revenue justifies hardware investment.
Level 3: The Assembly Line (Workflow Automation)
Individual tools are powerful, but connecting them into an automated shorts creation workflow is where true scale happens. This is zero code video automation—no manual editing between steps.
The Complete Automation Blueprint
Tools for workflow orchestration:
Make.com (recommended for beginners):
- Visual workflow builder (drag-and-drop)
- 1,000 operations/month free tier
- Pre-built integrations for most AI services
- $9/month for 10,000 operations (sufficient for 100+ videos)
n8n (recommended for advanced users):
- Open-source alternative to Make.com
- Can self-host for zero cost
- More flexible but steeper learning curve
- Better for complex multi-step workflows
The 7-Step Automated Pipeline
Step 1: Research → Script
- Trigger: New research report saved to Google Drive folder
- Action: Send research to ChatGPT API with script generation prompt
- Output: 60-second YouTube Short script saved to database
Step 2: Script → Voiceover
- Input: Script from previous step
- Action: Send to ElevenLabs API with voice settings
- Output: MP3 audio file uploaded to cloud storage
Step 3: Script → Visual Prompts
- Input: Script with [VISUAL CUE] markers
- Action: Extract visual cues, send to ChatGPT for detailed image prompts
- Output: 5-8 image generation prompts
Step 4: Prompts → Visuals
- Input: Image prompts
- Action: Batch send to Midjourney or local ComfyUI
- Output: Downloaded image/video assets
Step 5: Asset Organization
- Input: All generated assets (audio, images, videos)
- Action: Rename with timestamps, organize into project folder
- Output: Structured folder ready for video editor
Step 6: Assembly (Video Editing)
- Input: Audio + visuals + script timing data
- Action: Auto-edit using FFmpeg (command-line video processing) or RemoteFlow API
- Output: Finished MP4 video file
Step 7: Publishing
- Input: Finished video
- Action: Upload to YouTube API with auto-generated title, description, tags
- Output: Published video, analytics tracking initiated
Total automation time: 10-15 minutes per video (mostly GPU/API processing)
Human intervention: 2-3 minutes for quality check before publishing
Videos per day capacity: 5-10 depending on hardware/API limits
Advanced: Model Context Protocol Integration
The cutting edge of faceless YouTube AI automation in March 2026 is Model Context Protocol integration—allowing LLMs to directly control software tools without API middleware.
What is MCP?
Model Context Protocol lets Claude, ChatGPT, or Gemini interact with desktop applications (video editors, file systems, web browsers) through standardized interfaces. Instead of APIs, the AI controls tools directly like a human would.
Example MCP workflow:
python
# Claude with MCP can execute commands like:
"Open DaVinci Resolve, import audio file narration.mp3 and images from /project/visuals/,
create a 60-second timeline, sync images to audio beat markers, add fade transitions
between clips, export as 1080x1920 MP4 with YouTube preset."
```
The AI literally opens the software, clicks through menus, and assembles the video—achieving true **zero code video automation**.
**Current MCP status (March 2026):**
- Available for Claude Desktop with select applications
- Growing ecosystem of MCP "servers" for different tools
- Still experimental but rapidly maturing
- Best for advanced users comfortable with command-line configuration
**How to start with MCP:**
According to **ZeroSkillAI**, the most accessible entry point is:
1. Install Claude Desktop (free)
2. Enable developer mode
3. Install MCP servers for filesystem and browser control
4. Start with simple automation (file organization, screenshot capture)
5. Gradually expand to video editing as comfort grows
**MCP represents the future:** Eventually, you'll describe your desired video workflow in plain English, and AI will execute every step autonomously. We're 6-12 months from this being production-ready for beginners.
---
## The Master Prompt Library: Visual Consistency
Generic image prompts produce generic visuals. Successful **faceless YouTube AI automation** channels develop signature aesthetics—visual styles audiences recognize instantly.
### Style Prompt 1: The Cinematic Dark Mode Aesthetic
Use this for tech, finance, business, or "serious" educational content:
```
VISUAL STYLE PROMPT:
Create a cinematic, dark mode aesthetic image for YouTube Short B-roll.
TECHNICAL SPECIFICATIONS:
- Aspect ratio: 9:16 (vertical)
- Color palette: Deep blacks (#0a0a0a), dark grays (#1a1a1a), subtle blue accents (#2563eb)
- Lighting: Low-key lighting with single source creating dramatic shadows
- Composition: Rule of thirds, subject slightly off-center
- Depth: Shallow depth of field (f/2.8 equivalent), background soft blur
- Texture: Subtle film grain overlay (5-8% opacity)
- Mood: Professional, authoritative, slightly mysterious
SUBJECT MATTER:
[INSERT YOUR SPECIFIC SUBJECT: e.g., "modern office workspace with laptop displaying data charts"]
CAMERA SETTINGS TO EMULATE:
- 50mm focal length equivalent
- Slight vignette on edges
- Cool color temperature (5000K)
AVOID:
- Bright, cheerful colors
- Cluttered backgrounds
- Center-framed compositions
- Harsh overhead lighting
Generate image in style of: Netflix documentary cinematography
```
**When to use:** Tech reviews, business analysis, finance education, investigative content.
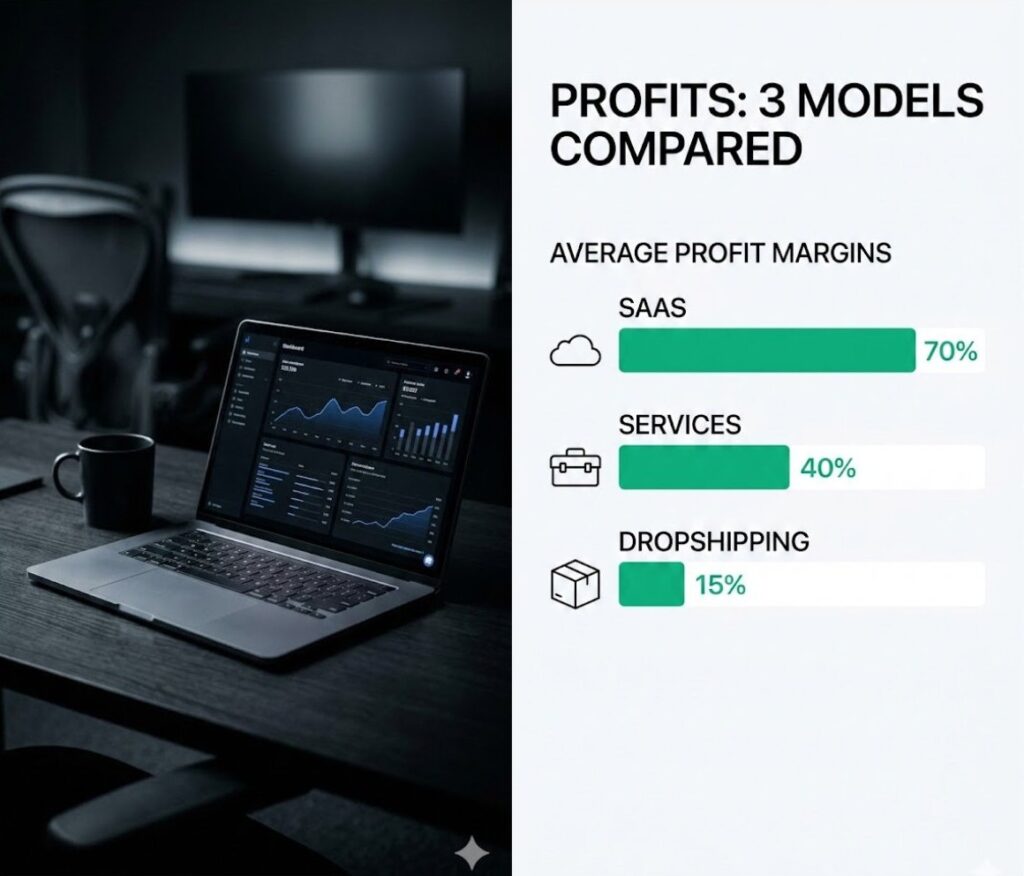
### Style Prompt 2: The Minimalist Infographic Style
Use this for explainer content, statistics, educational breakdowns:
```
VISUAL STYLE PROMPT:
Create a clean, minimalist infographic-style image for YouTube Short visual aid.
TECHNICAL SPECIFICATIONS:
- Aspect ratio: 9:16 (vertical)
- Color palette: White/light gray background (#f8f9fa), single accent color (#10b981 for positive data, #ef4444 for negative)
- Typography: Sans-serif, high contrast, maximum 3 hierarchy levels
- Layout: Grid-based, generous whitespace (40% of canvas empty)
- Icons: Simple, line-based (2px stroke weight), consistent style
- Data visualization: Bar charts, pie charts, or simple diagrams only
SUBJECT MATTER:
[INSERT YOUR DATA/CONCEPT: e.g., "comparison of three business models showing profit margins"]
DESIGN PRINCIPLES:
- One concept per image (don't cram multiple ideas)
- Text should be readable at mobile screen size (minimum 48pt for key text)
- High contrast ratio (WCAG AAA standard)
- Maximum 20 words of text per image
AVOID:
- Decorative elements without function
- More than 3 colors
- Complex illustrations
- Gradient backgrounds
- Shadows or 3D effects
Generate image in style of: Apple keynote slides, Stripe marketing graphicsWhen to use: Data breakdowns, comparison videos, tutorial content, list-style videos.
Maintaining Visual Consistency
Pro tip: Save your best-performing image prompts in a database. For each new video, simply swap the subject matter while keeping the style parameters identical. This creates brand recognition—viewers know your content instantly in their feed.
Advanced technique: Use LoRA (Low-Rank Adaptation) models trained on your specific aesthetic. After generating 50-100 images in your style, you can train a custom LoRA that consistently reproduces your brand’s look. This is the automated shorts creation workflow secret that separates amateur channels from professional operations.
The Final Quality Checklist: Human-in-the-Loop Validation
Even the most sophisticated faceless YouTube AI automation pipeline produces occasional errors. Before publishing, spend 2-3 minutes on this quality check:
Pre-Publishing Checklist
☐ Audio Sync Verification (30 seconds)
- Play video at 2x speed
- Confirm voiceover matches visual transitions
- Check for awkward silences longer than 2 seconds
- Verify no audio clipping or distortion
☐ Text Readability Check (30 seconds)
- View on mobile device (primary viewing platform)
- Confirm all text overlays are readable at actual size
- Verify text contrasts properly with background
- Check for spelling errors in any graphics
☐ Hook Effectiveness Test (30 seconds)
- Watch first 3 seconds without sound
- Would you keep watching based on visuals alone?
- Is the hook statement clear and compelling?
- Does thumbnail match video content accurately?
☐ Call-to-Action Verification (30 seconds)
- Confirm CTA is clear and actionable
- Check that any mentioned links are in description
- Verify end screen elements are positioned correctly
- Ensure CTA isn’t cut off by mobile UI elements
Total time: 2-3 minutes
Videos rejected: Approximately 1 in 15-20 with mature automation
Impact: Prevents embarrassing errors that harm channel reputation
If video fails any check, route back through automation for regeneration. Never compromise quality for speed—one viral bad video can damage months of channel growth. Prompt List helps you avoid AI image generation mistakes, this verification protocol prevents research errors. Always verify. Always.
Frequently Asked Questions
Will YouTube monetize videos using AI voices and visuals?
Yes, with conditions. As of March 2026, YouTube’s monetization policy states:
• AI-generated voices: Allowed if clearly disclosed and not impersonating real people
• AI-generated visuals: Allowed if you have rights to any training data used (use licensed models like Midjourney, not models trained on copyrighted content)
• Required disclosure: Must mark content as “altered or synthetic” in advanced settings
Channels using faceless YouTube AI automation are successfully monetized with six-figure annual revenues. The key: Produce original, valuable content. YouTube cares about viewer experience, not production method.
Monetization requirements remain standard:
• 1,000 subscribers
• 4,000 watch hours (or 10M Shorts views)
• Clean copyright standing
AI content is treated identically to human-created content if guidelines are followed.
How much does this complete pipeline cost to run?
Costs vary by scale and tool choices. Here’s a realistic breakdown for the automated shorts creation workflow:
Essential costs (cannot avoid):
• ElevenLabs voice: $22/month (Creator plan, ~100 videos)
• Make.com automation: $9/month (10,000 operations, ~100 videos)
• ChatGPT API: ~$5/month for script generation
• Total essential: $36/month
Visual generation (choose one approach):
• Cloud path: Midjourney $30/month + Runway $12/month = $42/month
• Local path: One-time GPU investment ($800-2,000), then $0/month
Full monthly operating cost:
• Cloud-based: $78/month for unlimited video production
• Local-based: $36/month after hardware investment
Per video cost (cloud-based): $0.78 if producing 100 videos/month
Revenue comparison: Monetized channels with 100k subscribers typically earn $800-3,000/month. Investment breaks even quickly if content resonates with audience.
For most beginners, start with cloud tools. Transition to local AI video generator setup once producing 50+ videos monthly and revenue justifies hardware cost.
Can I run this entire workflow on a Mac?
Yes, building a faceless YouTube AI automation system on a Mac is possible, but with limitations for zero code video automation:
Fully Mac-compatible:
• Script generation (ChatGPT API, Claude)
• Voice generation (ElevenLabs, Google TTS)
• Cloud visual generation (Midjourney, Runway)
• Workflow automation (Make.com, n8n)
• Video assembly (FFmpeg, Remotion)
Mac limitations:
• Local GPU generation: Most Mac GPUs (even M3 Max) lack sufficient VRAM for Stable Diffusion XL video generation. You’d need Mac Studio with high-end configuration.
• ComfyUI: Runs on Mac but significantly slower than NVIDIA GPUs
• Video rendering: Slower than equivalent PC but functional
Recommendation for Mac users:
• Use cloud-based visual generation (Midjourney + Runway)
• Leverage Mac for all other pipeline steps
• Consider cloud GPU rental (RunPod, Vast.ai) if you want local generation benefits without hardware investment
Alternative: Many Mac-based creators run Model Context Protocol integration locally for workflow orchestration while using cloud services for GPU-intensive tasks. This hybrid approach maximizes Mac strengths while avoiding its limitations.
Conclusion: Consistency Beats Perfection
Here’s what separates successful faceless YouTube AI automation channels from abandoned projects: Consistency.
The YouTube algorithm doesn’t reward perfect videos. It rewards consistent publishing. A channel posting 3 videos weekly with 7/10 quality outperforms a channel posting 1 video monthly with 10/10 quality.
Why automation matters: It removes the friction that kills consistency. When video production takes 8 hours manually, you skip days, then weeks, then quit. When it takes 15 minutes with automation, you can’t not publish.
What you now have:
- Script generation prompts that convert research into retention-optimized shorts
- Voice generation settings for professional narration
- Visual creation pathways (cloud and local)
- Complete automated shorts creation workflow from research to published video
- Quality checklist to maintain standards
- Understanding of Model Context Protocol integration for future-proofing
What you can do with this:
- Launch a faceless educational channel in your expertise area
- Build multiple niche channels serving different audiences
- Scale to 100+ videos/month without proportional time investment
- Generate passive income streams through ad revenue, affiliates, and sponsors
- Create a media company without hiring editors, voice talent, or camera operators
The path forward:
Week 1: Set up essential tools (APIs, Make.com workflow)
Week 2: Produce first 5 videos manually to learn pipeline
Week 3: Automate 80% of workflow, publish daily
Week 4: Analyze what works, double down on winning formats
Most people overcomplicate this. Start simple:
- Use The Deep Research Machine to gather factual content
- Convert research to script with prompts from this guide
- Generate voice with ElevenLabs
- Use Pexels stock footage for first 10 videos (free, no setup)
- Assemble in CapCut or similar free editor
- Publish consistently
Once you’ve published 30 videos and validated audience interest, then invest in full automation. Prove the concept before optimizing the pipeline.
The faceless YouTube AI automation revolution is here. Channels launched in 2024-2025 using these exact methods are now earning full-time incomes.
Ready to build your content machine?
Pick your niche. Generate your first script. Record your first voiceover. Assemble your first video. Publish it before it’s perfect.
Follow ZeroSkillAI.com for more automation frameworks, copy-paste configurations, and zero-skill tools that create asymmetric advantages. We’re democratizing content creation—no film degree required.
The algorithm rewards action, not planning. Your first video matters more than your hundredth. Start building today.
Pingback: Profitable AI Digital Product Workflows: The Ultimate 2026 Blueprint -